Pages

Tuesday, August 30, 2022

sending sunflowers with mft stamps

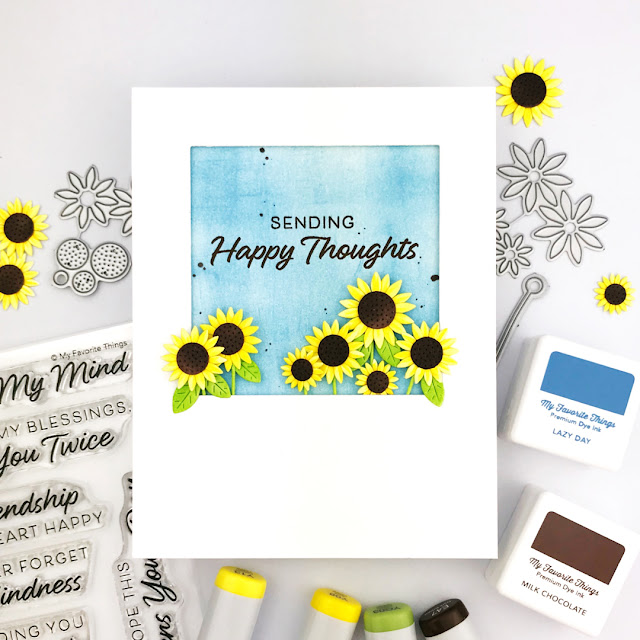
Are you looking to brighten a friend's day with happy thoughts? I recommend sending sunflowers in paper form! And I've got a sunflower card to share with you using the latest MFT Sending Sunflowers Card Kit!


To create the card I started by swiping a Lazy Day blue ink pad across my card front. I love the color and I love the soft texture the direct-to-paper technique creates.

Then I stamped the sentiment from the Thoughtful Greetings set in Milk Chocolate.

I foam mounted a panel with a square window die cut from it and then I made bunches of sunflowers!

There are three adorable sizes of sunflowers in the kit. And there are two of each size (plus the middles) so you only need one pass through your die cut machine to create the layered flower. It goes flower, flower and middle. As you can see I really like making them, LOL!

Thanks so much for stopping by! I hope you have time to pop over to the MFT blog to check out more cards made with the kit (and maybe treat yourself to the kit too)!

Hugs!
Carly

Monday, August 29, 2022

sending sunflowers card kit

Do you love adding die cut flowers to your handmade cards? Well wait until you see the latest dies in MFT's Sending Sunflowers card kit!

MFT Stamps is releasing their latest card kit tomorrow but today I've got a little sneak peek for you! Here's the first of probably many cards...
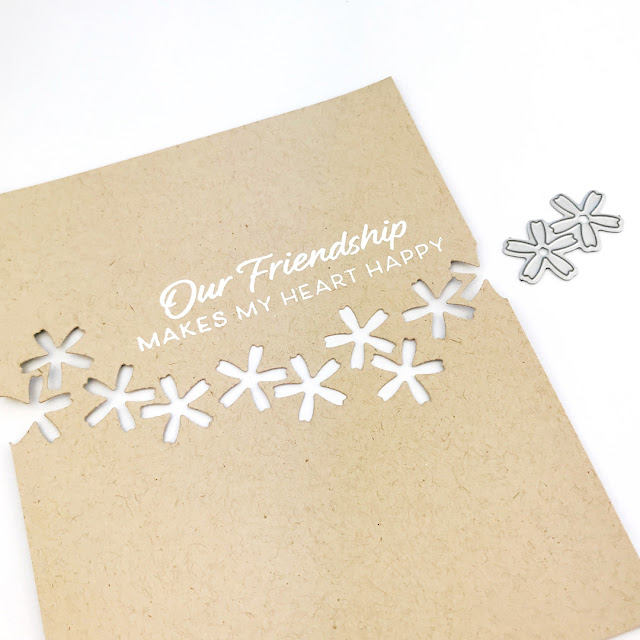
I combined a little positive and negative die cutting with these daisies to give this clean & simple card some fun texture.

First I stamped & embossed the sentiment in white. I wanted the sentiment there first to help me arrange the flowers.

Next I repeatedly die cut the daisies across the panel. The daisy die is two flowers connected and they are meant to be cut twice and layered.
Then I adhered the kraft panel to a folded white card. In addition to using strong double-sided tape around the edges, I like to use a little glue pen around the die cut openings to make sure it is really stuck down and secure.
Next I die cut more daisies but in white and layered those over the negative die cut daisies.
I finished the daisies with a yellow center (it's another tiny die from the set) and a little white splatter.

I love the soft texture it gives the card!

I would love it if you stop by again tomorrow to see more and get more details about the kit!!! And pop over to the MFT blog today for more eye candy!

Hugs!
Carly

Wednesday, August 24, 2022

mft sketch challenge 608

Are you ready for a creative challenge? It's sketch challenge day over on the MFT Stamps blog and today's sketch definitely challenged me! Do you ever make a card and then think "there was probably a better way to do that?" Let me show you what I did and maybe you have some advice for me.

First here's the sketch...

And here's my card...

I used a partial die cutting technique with MFT Sand & Surf die to cut the front of the card and make that first "hill".

I ink blended the front with Distress Oxide Cracked Pistachio. Then I used one edge on the Rolling Hills stencil to ink blend the top of the "hill" with Distress Oxide Lucky Clover. This created the second hill/wave from the sketch.

I stamped, cut & colored the adorable alligator from the My Smile Is Bigger set.

Then I adhered him to the card, on top of the hill.


I adhered another blank die cut alligator to the back to make it look cleaner.

BUT now I'm wondering...should I have stamped the alligator directly on the card front and partially die cut him? Hmmm...I might need to make this card again, LOL!

Let me know what you think and definitely let me know if you enter the challenge because I would love to see your take on the sketch! (Pop over to the MFT Stamps blog to see more about the challenge.)

Hugs!
Carly

Thursday, August 18, 2022

mft color challenge 195

Are you looking for a little creative jumpstart for your cardmaking? I highly suggest joining in on a cardmaking challenge and there just happens to be a new color challenge starting on the MFT stamps blog today *wink*

I have a tendency to use the same few ink colors over and over on my cards so having to use another color palette is a fun change & challenge!

Here's the color palette for the challenge...
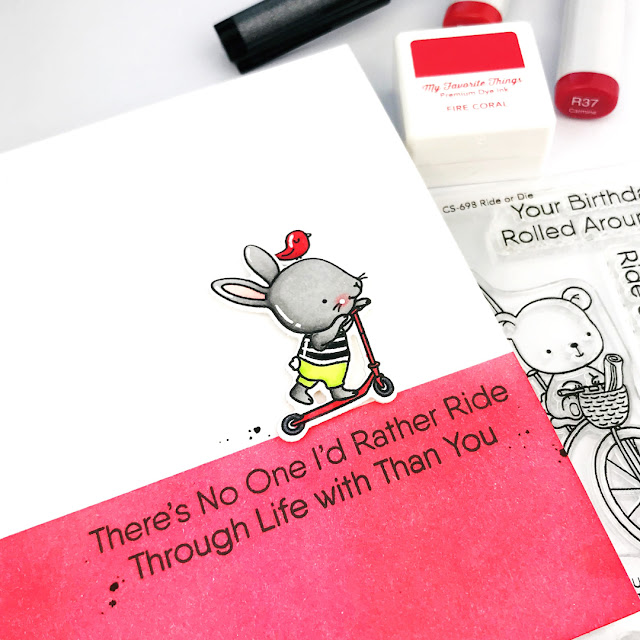
When I saw it, I instantly thought I would make a holiday card BUT I ended up making this instead...
I had been wanting to color some of the cuties from the Ride or Die set so I decided to see if I could incorporate the colors. Here are the Copic colors that I found matched well...
  • Scooter & Bird - R35 & R37
  • Bunny - T1, T2, T4, YG01, YG03 and a black Multiliner to color the striped shirt
For the card I masked the bottom and ink blended Fire Coral for a simple but bold color blocking.
I hope you are inspired to join in this color challenge! Pop over to the MFT blog to learn more and thanks so much for stopping by!

Hugs!
Carly

Tuesday, August 16, 2022

hocus pocus halloween card with mft stamps

Summer isn't over but the latest MFT release has some stamps & dies that have me really excited for fall & Halloween!

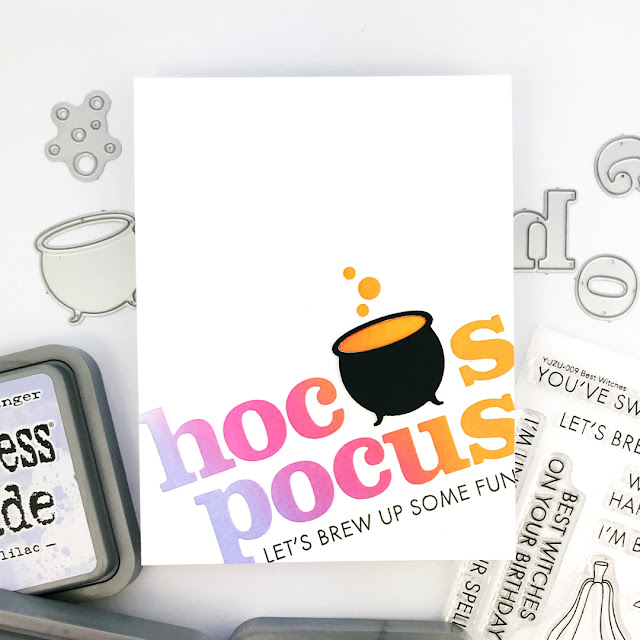
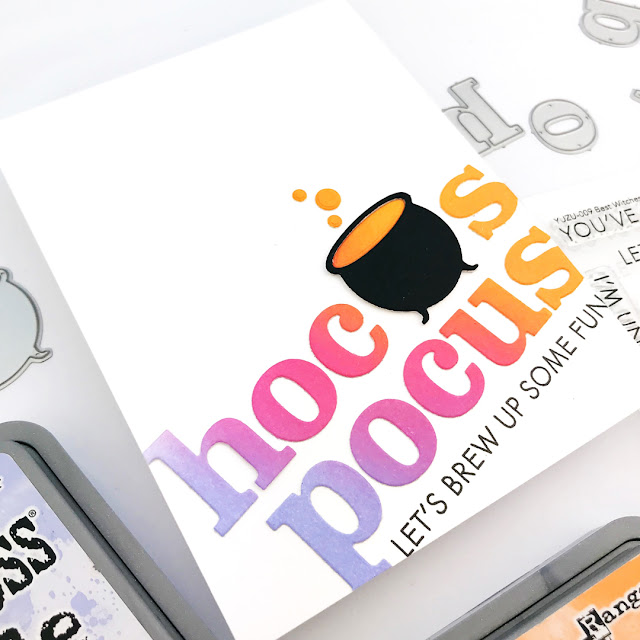
I used the Modern Serif Alphabet (one of my favorite sets) to die cut letters from an panel ink blended with Distress Oxide Shaded Lilac, Picked Raspberry and Carved Pumpkin.

I replaced one of the u's with the Witch's Cauldron. And I used a sentiment from Best Witches. I love how bright and graphic the card turned out (even if my spacing isn't quite right, LOL).
If you haven't had a chance, I highly recommend popping over to the MFT blog to see more of the new release!

Thanks for stopping by!
Carly

Monday, August 15, 2022

a super hero birthday shaker with mft stamps

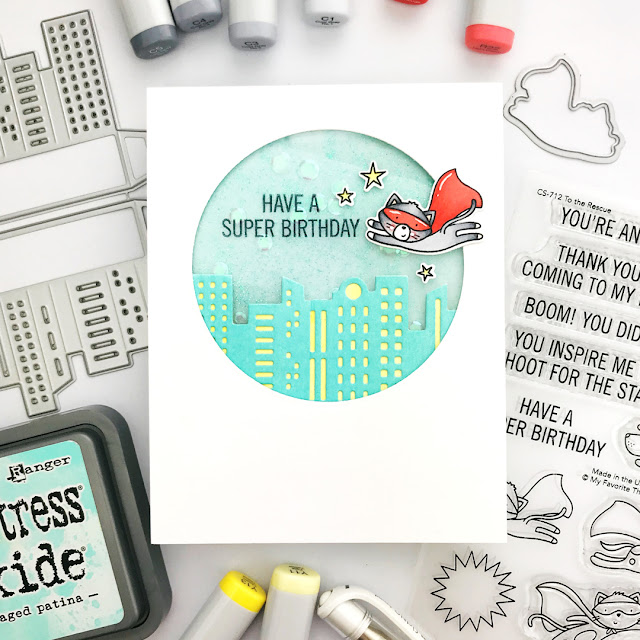
Do you need an extra super birthday card for someone special? Well I hope I can help spark some ideas for you with my latest shaker card featuring some of the latest MFT release(that comes out tomorrow)!


The new MFT Stamps To The Rescue is so darn cute! It pairs perfectly with the Outside The Box Cityscape and the cityscape is perfect in a shaker window!
I cut the cityscape from white cardstock then colored it with Distress Oxide Salvaged Patina and a blending tool. I traced the cityscape on another piece of white cardstock and cut it out. I colored it yellow and glued it on the back of the cityscape to light the buildings.

For the shaker window I layered a white panel with a circle window, the cityscape and a piece of acetate stamped with the "have a super birthday" sentiment.

Lastly I stamped, die cut and colored "super cat" to adhere on top.


To see more of what's coming from MFT this August, pop over to the MFT blog and YT.

Hugs!
Carly

Sunday, August 14, 2022

hey ghoul card + 2 days until the mft may release

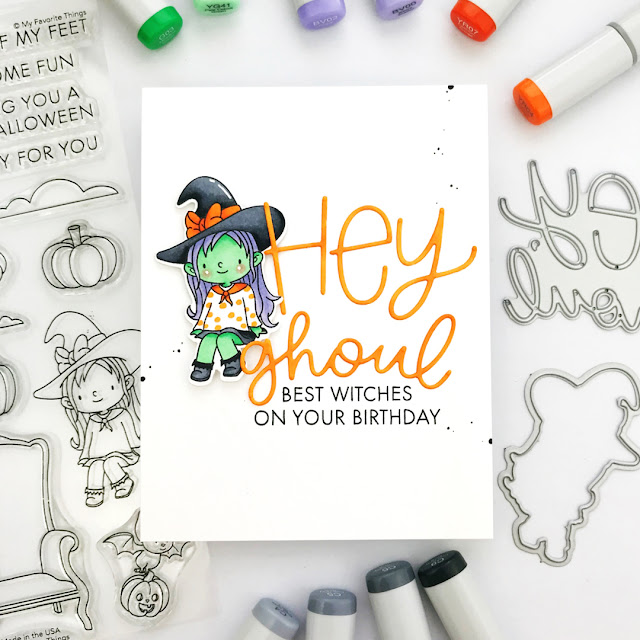
There's only 2 days left until the MFT Stamps August release and I've got a Halloween-ish, hey ghoul card to share with you...

I love character & critter stamps but I'm often intimidated by the idea of creating scenes for them so I love to pair them with big sentiments like this witch from the Best Witches set and the Hey Ghoul dies.

Now I'm not sure if I love the greens I chose for my little witch, I might have to try again. But I do love how the card turned out, with her "sitting" on the word.


To see more of the MFT August release, make sure you pop over to the MFT blog!

Thanks so much for stopping by! Hope to see you again tomorrow for the last little sneak peek!

Hugs!
Carly

Saturday, August 13, 2022

simple stamp masking for mft august countdown day 3

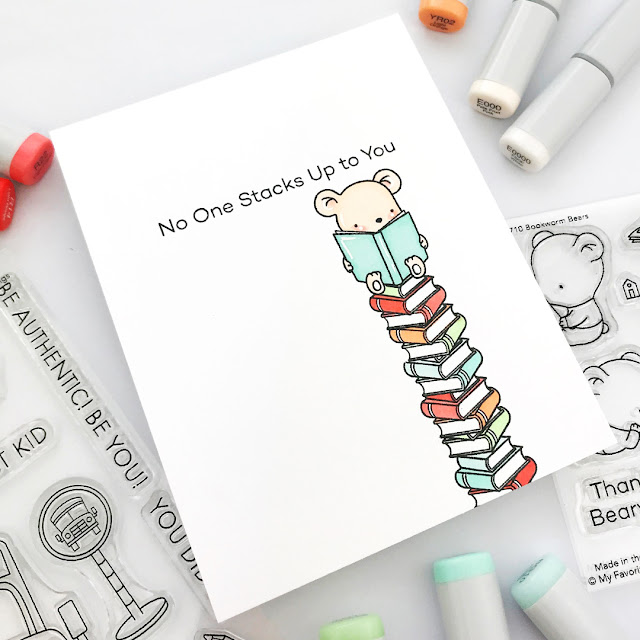
Masking is one of my favorite stamping techniques because it feels like magic to combine separate images into something else. As we are counting down to the MFT Stamps release, I created a card with some simple masking...

If you haven't used masking techniques with your stamps it is really just the process of stamping one image and then covering it or part of it before stamping another image over it so the first image is in front or on top.

For example on this card I stamped the little reading bear from the Bookworm Bears first on my card front. Then I stamped him again on a post-it note, cut him out and placed the post-it note bear over the bear on my card front.

Then I stamped the stack of books from the School Is Cool set so the bear looks like he is sitting on the books.

I made another post-it mask, this time with the books, and masked them on the card so I could stamp books down the card creating the tower.

After stamping all the images I just colored them simply with Copic markers.


Thanks for stopping by! You can find more peeks at the MFT August release on their blog and YouTube channel.

Have a great day!
Carly

Friday, August 12, 2022

mft stamps august release countdown day 4

There are 4 days left until the MFT Stamps August release and I've got a decidedly fall card to share with you!

The Greatest Blessing set has the sweetest pumpkins in a wheelbarrow! I colored them simply and added a little glitter for a Cinderella vibe.

Thanks for stopping by! You can find more peeks of the MFT August release on their blog and YouTube channel.

Have a great day!
Carly

glossy ghosts with pretty pink posh

Are you getting excited for Halloween crafting? I'm assuming you are saying "heck yes" to whatever device you are on so...ME TOO!!! 

I love creating cute, sweet cards & goodies for Halloween so I'm thrilled with the new Pretty Pink Posh release! And I'm honored they asked me to join in day 3 of their blog hop!

Before I share my card, I've got extra fun news! There are 3 $25 gift certificates to Pretty Pink Posh up for grabs! Enter to win by leaving comments along the hop by 11:59pm PST on August 17th, 2022. The winners will be announced on the PPP blog.
One of my favorite ways to create a colorful card that includes white images is with Glossy Accents masking! It's a perfect technique for the cutie pie ghosts from the PPP Ghost Friends set!

Here's the technique in a nutshell...
  • stamp image you want to be white on white cardstock
  • fill image with Glossy Accents & let dry completely
  • add color with ink blending or watercoloring, etc.
And here are some of my tips for success...
  • stamp images in waterproof ink to avoid the lines blurring & bleeding when you add Glossy Accents
  • add any details (like pink cheeks) with alcohol markers or colored pencils before adding Glossy Accents
  • use a craft pick to "erase" any wet Glossy Accents outside of the lines and to push/pull Glossy Accents into tight areas
  • make sure Glossy Accents is really, really dry before adding color
Your next hop stop is Yoonsun's blog and I know she is going to knock your socks off! And here's the whole list in case you need it...


Thanks so much for hopping with us! Hugs!!!
Carly

Thursday, August 11, 2022

hello to the mft stamps august release countdown

I love creating & sending hello cards because I love receiving them! What's better than opening your mailbox to find someone sent you a card just because they were thinking of you?!

I've got a hello card to share with you today, as we start the countdown to the MFT Stamps August release!

I've never met a word die that I didn't want to turn into a shaker window, especially big dies like this Tall Hello! I couldn't resist!

And the sentiments in the How To Say Hello stamp set are wonderful, perfect to go above, beside or beneath the hello window.

Thanks for stopping by! You can find more peeks at the MFT August release on their blog and YouTube channel.

Have a great day!
Carly

P.S. Want to see my favorite way to make a shaker card like this? Check out this recent reel I shared on Instagram with another MFT Stamps die I love!

Saturday, August 6, 2022

alcohol ink marbling with essentials by ellen

Have you ever tried marbling paper with alcohol inks? It's one of my favorite inky, cardmaking techniques and it's so fun to do! You can check out my latest reel on IG to see what I mean!


Marbling with alcohol inks is truly an example of when the artistic process and the product are equally wonderful so when I break out the alcohol inks, I make a ton of backgrounds! And then I need to use them for cards...

I started by die cutting a white cardstock panel with the jellyfish from the Essentials by Ellen Seaweeds set.

I adhered the die cut panel to one of the marbled panels.

Then I stamped the coordinating jellyfish image in all the die cut areas.

Finally I added the cutest sentiment from the Essentials by Ellen O-Fish-al set and a little faux black splatter (made with a marker). 

What do you think?


Thanks so much for stopping by!
Carly

supplies:
affiliate links may be used at no additional cost to you. thank you!